
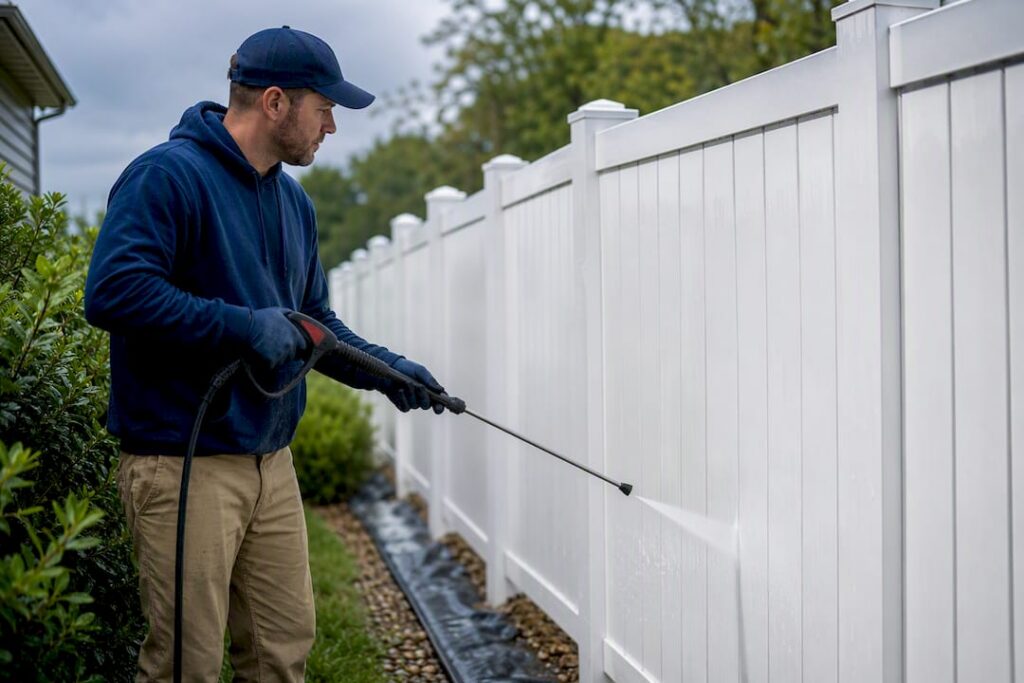
Yes, pressure washing a PVC fence is safe when you control the pressure and keep the nozzle moving. Stay in the 800 to 1,500 PSI range with a 25° or 40° wide fan tip, hold the wand 12 to 18 inches from the surface, and never use a zero-degree red tip. Patch-test a hidden panel first, especially on vulnerable older or sun-bleached vinyl.
TL;DR:
- Using a pressure of 800 to 1,500 PSI with a wide fan nozzle is safe for vinyl fences, especially when staying near the lower end for older or sun-bleached panels.
- Always test a small hidden section at low pressure and keep the nozzle 12 to 18 inches from the surface before full cleaning to prevent damage.
- Hot water or high flow rates are unnecessary and can warp PVC; cold or lukewarm water with the correct flow and detergent is sufficient.
- Avoid using zero-degree tips, cleaning too close, or scrubbing with abrasive tools, as these actions can etch or damage the vinyl surface.
- Consider professional cleaning for older fences, heavy algae growth, or areas with delicate landscaping to prevent long-term damage and ensure proper runoff management.
Table of Contents
- What PSI, Nozzle, and Distance Should You Use on Vinyl?
- How Do You Pressure Wash a PVC Fence Step by Step?
- When Should You Skip the Pressure Washer Entirely?
- What Mistakes Ruin a Vinyl Fence During Cleaning?
- What Do Professionals Do Differently on Vinyl Fences?
- DIY or Call a Professional?
- Get Your Fence and Property Cleaned Without the Guesswork
- Sources
What PSI, Nozzle, and Distance Should You Use on Vinyl?
Most residential vinyl fencing cleans up well between 800 and 1,500 PSI. That range strips off dirt film, pollen, and light algae without stressing the plastic. Some big-box guides list a ceiling closer to 2,500 PSI, but that number assumes ideal conditions and a steady hand. For a homeowner running a rented or consumer-grade machine, staying closer to the lower end is the safer bet, particularly on fencing that’s been in the sun for a decade or more.

Nozzle choice matters as much as PSI. A zero-degree red tip concentrates water into a pinpoint stream that acts almost like a blade on plastic, etching or gouging the surface in seconds. Stick with a 25° or 40° wide fan nozzle instead, and keep the wand 12 to 18 inches from the vinyl at all times.
Quick reference for your setup:
- PSI range: 800 to 1,500 for standard vinyl; stay near 800 to 1,000 for fencing older than 10 years or already showing chalking.
- Nozzle: 25° or 40° wide fan tip only. Never attach a 0° tip to this job.
- Distance: 12 to 18 inches, moved in a steady sweeping motion, never held stationary.
- Water temperature: Cold or lukewarm tap water. Hot water softens PVC and can warp panels or loosen adhesive seams.
- Flow rate and detergent: A machine rated 1.5 to 2.5 GPM with a detergent injector tank handles most residential jobs and lets you apply soap at low pressure before the rinse pass.
Pro Tip: If you’re renting a machine, ask specifically for a nozzle kit with 25° and 40° tips included. Many rental units default to a 0° or 15° tip because contractors use them on concrete, and that’s the wrong tool for plastic fencing.
How Do You Pressure Wash a PVC Fence Step by Step?
Cleaning a vinyl fence isn’t complicated, but skipping steps is exactly how homeowners end up with etched panels or streaked sections that look worse than before they started.
- Clear the work area. Remove leaning items, potted plants, and anything stacked against the fence. Trim back shrubs or vines touching the panels so you can reach every surface.
- Protect landscaping. Lay a tarp or plastic sheeting over flower beds and garden edges near the fence line, especially if you’re using detergent. This matters even more if you’re gardening organically, since runoff from cleaners can affect soil.
- Secure gates and hardware. Latch gates and check hinges before you start. Wet vinyl gets slippery, and a swinging gate mid-wash is an easy way to get hit.
- Patch-test first. Pick a 1 to 2 square foot spot low on the fence, photograph it, and clean it at your lowest pressure setting from 18 inches away. Wait 24 hours and check for fading, softening, or water intrusion before you commit to the whole run.
- Mix your cleaner. For general grime, mild dish soap diluted at about 1 tablespoon per gallon works fine. For algae or mildew, an oxygen-based cleaner mixed per the product label and loaded into the pressure washer’s detergent tank cuts through growth without bleaching the vinyl.
- Apply detergent low to high. Spray the soap mixture on at low pressure, working bottom to top so drips don’t streak clean sections. Let it sit 5 to 10 minutes, but don’t let it dry on the surface.
- Scrub stubborn spots. Use a soft-bristle brush on seams, post caps, and areas with caked-on algae before rinsing.
- Rinse top to bottom. Switch to your wide fan nozzle and rinse from the top down, keeping the wand moving in overlapping passes. Avoid aiming directly into seams, post caps, or joints, since water can seep into hollow posts and never fully drain.
- Let it dry before touching or locking gates. Give the fence at least an hour of air-dry time in mild weather before you latch gates or lean anything back against it.
- Know when to stop. If a panel feels soft, chalky residue keeps wiping off on your hand, or you spot cracking during the patch test, stop and call a professional instead of pushing forward.
For readers cleaning other exterior surfaces the same weekend, the technique for pressure washing home exterior steps follows a similar low-and-slow approach, just with different PSI targets for masonry versus plastic.
When Should You Skip the Pressure Washer Entirely?
Small fences, light dust, or a single stained panel usually don’t need a pressure washer at all. A bucket and a soft brush get the job done with less risk.
- Mix 1 tablespoon of mild dish soap per gallon of warm water and scrub with a soft-bristle brush or sponge.
- For mildew or green algae film, a 1:5 solution of white vinegar to water breaks down growth without bleaching the vinyl’s color.
- For heavier algae staining, an oxygen bleach solution mixed per label instructions and left to sit for a few minutes lifts stains that soap alone won’t touch. Skip chlorine bleach, which can yellow vinyl over time.
- Hand-scrub instead of pressure washing on fencing over 15 years old, near failing seals, or anywhere you noticed chalking during a patch test.
- A melamine sponge (the kind sold as a “magic eraser”) can lift scuff marks, but scrub gently. It’s a mild abrasive, and repeated hard scrubbing dulls the vinyl’s finish over time.
What Mistakes Ruin a Vinyl Fence During Cleaning?
Most vinyl fence damage traces back to a handful of repeat offenders, and nearly all of them are avoidable once you know what to look for.
- Using a zero-degree tip. It’s the single fastest way to gouge or discolor a panel.
- Holding the wand too close. Anything under 12 inches at working PSI risks etching, even with a wide fan nozzle.
- Reaching for undiluted chlorine bleach or solvents. These break down the vinyl’s surface finish and can cause long-term yellowing.
- Scrubbing with stiff wire brushes or abrasive pads. Micro-scratches from harsh tools actually attract more dirt over time, creating a cycle of faster re-soiling.
- Washing in direct, hot sunlight. Cleaner dries on the surface before you can rinse it, leaving streaks that require a second full pass.
- Skipping the patch test. Ten minutes of testing saves you from finding out about brittleness on the wrong side of an entire fence run.
What Do Professionals Do Differently on Vinyl Fences?
Experience shows up in the small decisions, not the big ones. Pros gauge brittleness by pressing a thumbnail into a discreet spot. If the vinyl feels chalky or gives slightly, they drop to the bottom of the PSI range automatically rather than trusting a generic setting.

Cloudy days aren’t a scheduling accident either. Cleaner and rinse water evaporate slower in overcast, moderate conditions, which reduces the streaking that comes from detergent drying mid-job. Near flower beds or storm drains, experienced crews contain or capture runoff rather than letting soapy water run straight into the soil. Before any large job, they photograph a patch-tested section, note the date, and compare it 24 hours later. It’s a five-minute habit that prevents an expensive mistake.
Pro Tip: Keep your patch-test photos on your phone. If a panel starts looking off weeks later, you’ll have a clear before-and-after to check against instead of guessing whether the damage was there all along.
DIY or Call a Professional?
Small fence runs, light dust, or a confident hand with a rented washer make DIY perfectly reasonable. Heavy algae coverage, fencing older than 15 years, brittle or chalky vinyl, or a yard packed with landscaping you can’t afford to damage all shift the math toward hiring out. If you’re not sure which category your fence falls into after a patch test, that uncertainty is itself the answer: book a professional rather than risk a panel you can’t unetch. Our pressure washing service checklist walks through exactly that decision point in more detail.
— Jim
Get Your Fence and Property Cleaned Without the Guesswork
If patch-testing, nozzle swapping, and worrying about runoff near your garden beds sounds like more trouble than it’s worth, Professional services handle the entire job with trained operators and equipment specialized for vinyl, wood, and masonry surfaces.
Professional pressure washing jobs often capture wastewater through recycling systems to prevent runoff into lawns, storm drains, or flower beds. That matters most on properties with heavy algae growth, older fencing, or landscaping you can’t risk. Experienced crews typically select the PSI and nozzle combination suited to specific fence ages and materials, minimizing trial-and-error. Beyond fences, our residential pressure washing services cover driveways, siding, and decks, and pair naturally with our recurring bin cleaning plans if you want your whole property looking sharp on one schedule. Ready to get a quote? Visit American Bin Cleaning to schedule a service and see what’s included for your property.
Sources
For readers who want to go deeper on technique, Top Rail Fence’s cleaning guide covers PSI ranges and patch-testing in detail. ProTool Reviews breaks down nozzle selection for any plastic or painted surface, and Fence Advisors explains mold and algae removal for fencing near shaded, damp yards. If you’re maintaining a paver patio alongside your fence, Pave N’ Turf’s seasonal care guide covers protecting hardscaping during the same cleaning pass.
- Pressure-washer nozzles: tips and how to use
- How to clean a vinyl fence (Top Rail Fence)
- How to clean vinyl fence
- How to Clean & Maintain Vinyl Fence: Remove Mold, Algae & Stains


