
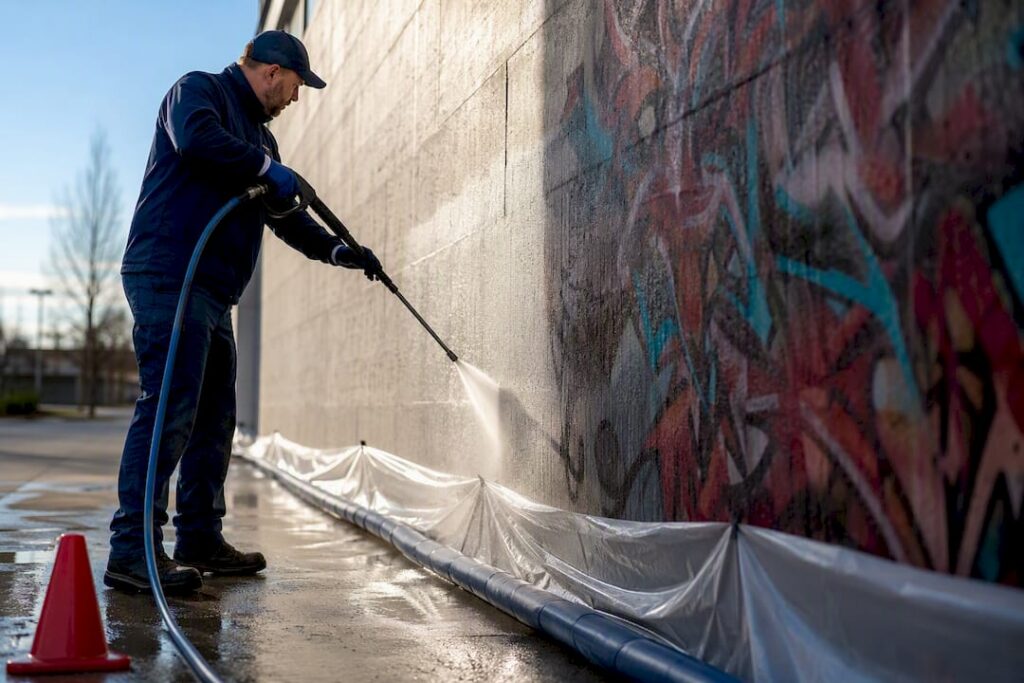
Chemical pre-treatment combined with properly tuned pressure washing removes most fresh graffiti from sealed, nonporous surfaces like metal, glass, and sealed concrete. Porous or historic masonry is a different story: paint soaks into the pores and often leaves a faint outline called ghosting, which needs poulticing rather than more pressure. For small jobs on tough, sealed surfaces, DIY works. For brick, stone, or anything historic, call a specialist before you make it worse.
TL;DR:
- Pressure washing is most effective on sealed, nonporous surfaces like metal, glass, and coated concrete, where paint sits on top rather than within the material.
- Porous surfaces such as brick and limestone absorb paint quickly, making aggressive pressure washing likely to cause ghosting, color variation, or permanent damage.
- Proper preparation includes containment of wastewater, testing chemicals on small patches, and using the correct chemical and pressure settings based on the surface.
- Using specialized techniques like poulticing or professional methods is necessary when paint has penetrated porous masonry or when dealing with soft historic materials.
- Speeding up removal within a day reduces repeat tagging risk, while poorly managed DIY pressure washing on delicate surfaces can cause irreversible damage, making professional help advisable.
Table of Contents
- What Surfaces Respond Best to Pressure Washing?
- How Do You Prep Safely Before You Start?
- What’s the Step-by-Step Pressure Washing Method?
- When Should You Use Specialist Techniques Instead?
- How Do You Prevent Repeat Tagging After Removal?
- When Is It Time to Call a Professional?
- Why “Gentle First” Beats “Blast It Away”
- Need a Professional Instead of a Weekend Project?
- Sources
What Surfaces Respond Best to Pressure Washing?
Surface type decides almost everything about your outcome, more than the chemical you pick or the machine you rent. Sealed and nonporous materials, painted metal, powder-coated fences, glass, laminate, and coated concrete, generally give up graffiti fast once a stripper has softened the paint film. The pigment sits on top of the surface instead of inside it, so pressure and hot water can flush it away in one or two passes.
Porous materials behave completely differently. Brick, unsealed mortar, limestone, and other soft stone absorb spray paint into their pores within hours, and once that happens, blasting the surface with more pressure just pushes pigment deeper. That’s how you end up with ghosting, a pale or discolored shadow where the tag used to be. Historic or soft substrates carry the highest risk. Incorrect pressure has documented cases of stripping the protective “fire skin” off limestone and leaving permanent wand marks and color variation on historic brickwork.
A few things that shift the odds in your favor:
- Fresh paint lifts far easier than paint that has cured longer.
- Enamel and acrylic spray paints respond better to chemical strippers than oil-based paints.
- Multiple layers from repeat tagging usually mean multiple treatment cycles, not one aggressive pass.
- Unsealed or previously patched masonry is more porous than it looks and should be treated as high risk.
How Do You Prep Safely Before You Start?
Containment comes first. Wastewater carrying paint pigment and surfactant should never run into a storm drain. Many municipalities require it, and letting runoff reach a storm sewer is a documented environmental concern tied to graffiti-removal chemistry. Set up a containment barrier or wet vacuum before you spray anything.
A basic prep sequence looks like this:
- Suit up: chemical-rated gloves, splash goggles, and a respirator rated for the stripper you’re using.
- Mask nearby windows, vents, and light fixtures with plastic sheeting.
- Move vehicles, cover plants, and block off foot traffic in the work zone.
- Photograph the graffiti with a timestamp before touching it, and file a police report if it’s vandalism (many insurers require one for a claim).
- Test your chemical and pressure setting on a small, hidden patch before treating the whole tag.
Pro Tip: Keep a small spray bottle of clean water on hand during testing. If the test patch shows any color bleed, discoloration, or surface pitting after a few minutes, stop and switch to a gentler method before you touch the visible tag.
What’s the Step-by-Step Pressure Washing Method?
Pressure alone rarely finishes the job. Effective removal is a combination of chemical pre-treatment, thermal softening from hot water, and mechanical flushing, and pressure washing without a chemical stripper first typically underperforms on anything but the freshest paint.
Start by matching the chemical to the substrate. Solvent-based strippers handle stubborn enamel and oil-based paints. Alkaline or caustic products work on some coatings but need careful containment. Gel-based removers, products like PROSOCO’s Graffiti Remover, SafStrip, and Sure Klean Heavy Duty Paint Stripper, cling to vertical surfaces long enough to work on masonry and sealed stone. Follow whatever dwell time the manufacturer lists, usually 15 to 60 minutes or longer for aged paint.
From there:
- Apply the gel or poultice from the bottom up to prevent streaking as it runs.
- Let it dwell the full recommended time. Rushing this step is the most common reason people end up repeating the whole job.
- Set your washer to a low to moderate pressure range for delicate masonry and reserve higher pressure only for substrates that can tolerate it.
- Keep the nozzle at least 12 inches from the surface, and never use a turbo or pinpoint tip on brick, stucco, or painted wood.
- Rinse bottom-to-top with hot water. Professional units commonly run well above tap temperature, and that thermal softening cuts down the mechanical force you need to finish the job.
- Repeat the chemical-and-rinse cycle on any spot still showing pigment before reaching for more pressure.
Work in small sections, roughly two to three square feet at a time, so the chemical doesn’t dry out before you rinse it.
When Should You Use Specialist Techniques Instead?
Poulticing is the go-to method once paint has soaked into porous masonry, because a poultice pulls dissolved pigment out of the pores instead of pushing it deeper. The mix is usually an absorbent powder, diatomaceous earth, kaolin clay, sepiolite, or cellulose pulp, blended with a compatible solvent into a paste, spread over the stain, then covered with plastic to slow evaporation and give it time to work.
Beyond poulticing, a few methods belong to trained specialists only:
- Micro-abrasion and soda blasting, which can etch soft stone if pressure or media grit isn’t calibrated correctly.
- Dry-ice blasting, effective on some coatings but requires equipment most property owners don’t own.
- Laser removal, precise but expensive, generally reserved for monuments and fine architectural detail.
Avoid these outright: angle grinders, wire wheels, turbo nozzles on brick or stucco, and undiluted caustic chemicals applied without containment. All four show up repeatedly in documented cases of irreversible damage to historic masonry. If ghosting persists after your first poultice cycle, repeat it rather than escalating to something more aggressive, or plan for a repaint and seal instead.
How Do You Prevent Repeat Tagging After Removal?
Speed matters. Removing graffiti within a day or two measurably reduces the odds a wall gets hit again, since taggers tend to avoid surfaces that don’t stay marked.
Anti-graffiti coatings fall into two camps. Sacrificial coatings are cheaper, wear away with each cleaning, and need reapplication after two or three removals. Permanent or tinted coatings cost more up front but let future paint wipe off with solvent alone, no stripper needed, and hold up for years on high-traffic walls.
Timeline and cost both hinge on the same variables:
- A fresh tag on a sealed surface: often done in a few hours.
- Cured or layered graffiti on brick or stone: multiple visits over several days, especially if poulticing is involved.
- Cost drivers include square footage, substrate porosity, access (ladders, scaffolding), containment requirements, and whether specialty chemistry or equipment is needed.
When Is It Time to Call a Professional?
Certain situations tip the scale toward hiring out: historic or landmark-designated buildings, wide-area commercial facades, graffiti that keeps ghosting after DIY attempts, or any job where local rules require documented wastewater containment.
Before you sign anything, vet the contractor:
- Ask for proof of liability insurance and a written containment plan.
- Confirm they tailor the method to your substrate rather than running one pressure setting on everything.
- Request before-and-after photos from similar jobs, plus at least one reference you can call.
Pro Tip: A contractor who quotes a price without asking what your surface is made of hasn’t actually assessed the job.
Professional crews typically bring hot-water units, trained operators, and closed-loop wastewater recycling that keeps chemical runoff out of storm drains, capabilities that are hard to replicate with a rented plastic-free commercial cleaning cloth or consumer washer.

Why “Gentle First” Beats “Blast It Away”

Most property owners want graffiti gone in one pass, and that instinct is exactly what causes the damage. The gentlest-method-first rule isn’t bureaucratic caution. It’s the difference between a clean wall and a permanently scarred one, because pressure that etches limestone or drives pigment deeper into brick can’t be undone with a second pass.
The property owners who get the best results are the ones who treat the first attempt as a test, not a finish line. Spend five minutes on a hidden patch before you touch the visible tag. If it lifts clean, proceed. If it ghosts, stop and switch to a poultice instead of turning up the pressure washer. That single habit prevents more permanent damage than any product choice ever will, and it’s the one step DIY guides consistently skip.
— Jim
Need a Professional Instead of a Weekend Project?
If reading through pressure ranges, dwell times, and containment rules made this sound like more equipment and risk than you want to take on, that’s a fair reaction. Professional companies handle residential and commercial pressure washing using on-board wastewater recycling systems to prevent runoff into lawns, driveways, or storm drains.
That containment matters most on exactly the jobs this article flags as risky: brick facades, storefronts, and anywhere local rules govern runoff. When you request a quote, ask what pressure range and chemistry the crew plans to use on your specific surface, and ask to see before-and-after photos of similar work. A contractor who can answer both questions without guessing is one worth hiring.
Check out residential and commercial pressure washing services to see what’s included, or get a quote started for your property today.
Sources
- Removing graffiti from historic masonry (US NPS via InspectApedia)
- Graffiti removal via powerwashing: techniques and limitations (Powerwashing Authority)
- Removing graffiti from your building or sidewalk (PROSOCO)


